What is Docker Storage ?
In this post, I'll try to explain how volumes work and present some best practices. Whilst this post is primarily aimed at Docker users to gain knowledge of volumes
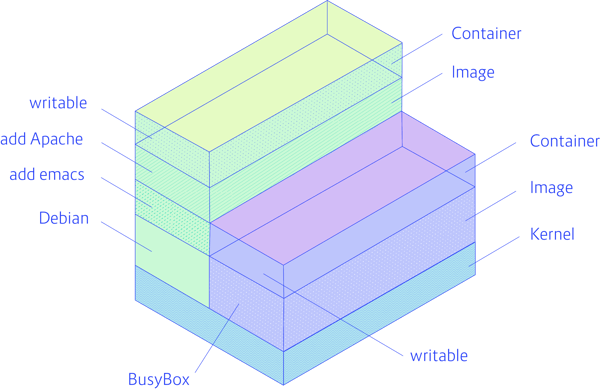
In order to understand what a Docker volume is, we first need to be clear about how the filesystem normally works in Docker. Docker images are stored as series of read-only layers. When we start a container, Docker takes the read-only image and adds a read-write layer on top. If the running container modifies an existing file, the file is copied out of the underlying read-only layer and into the top-most read-write layer where the changes are applied. The version in the read-write layer hides the underlying file, but does not destroy it -- it still exists in the underlying layer. When a Docker container is deleted, relaunching the image will start a fresh container without any of the changes made in the previously running container -- those changes are lost.
Image Storage
How are Docker images stored?
Let's imagine we want to pull a Docker image from a registry, like so:
$ sudo docker pull nginx
When you run this command, Docker will attempt to pull the nginx image from the Docker Hub, which is a bit like GitHub but for Docker images. On the Docker Hub, you can see the descriptions of Docker images and take a look at their Dockerfiles, which contain the instructions that tell Docker how to build the image from the source.
Once the command completes, you should have the nginx image in your local machine, being managed by your local Docker engine.
We can verify this is the case by listing the local images:
$ sudo docker images
You should see something like this:
REPOSITORY     TAG       IMAGE ID       CREATED        VIRTUAL SIZE
nginx          latest    5328fdfe9b8e   5 months ago   133.9 MB
Now, if we want to launch an nginx container, the process is very fast because we already have the nginx image stored locally.
We can launch it like so:
$ sudo docker run --name web1 -d -p 8080:80 nginx
This command maps port 80 of the container to port 8080 of the host machine. After it has run, you can connect to ipaddress:8080 to verify that nginx responds.
But what's going on in the background, as far as this container's file system is concerned? To understand that, we need to look at the copy-on-write mechanism.
The Copy-on-Write Mechanism
When we launch an image, the Docker engine does not make a full copy of the already stored image. Instead, it uses something called the copy-on-write mechanism. This is a standard UNIX pattern that provides a single shared copy of some data, until the data is modified.
To do this, changes between the image and the running container are tracked. Just before any write operation is performed in the running container, a copy of the file that would be modified is placed on the writeable layer of the container, and that is where the write operation takes place. Hence the name, "copy-on-write".
If this wasn't happening, each time you launched an image, a full copy of the filesystem would have to be made. This would add time to the startup process and would end up using a lot of disk space.
Because of the copy-on-write mechanism, running containers can take less than 0.1 seconds to start up, and can occupy less than 1MB on disk. Compare this to Virtual Machines (VMs), which can take minutes and can occupy gigabytes of disk space, and you can see why Docker has seen such fast adoption.
But how is the copy-on-write mechanism implemented? To understand that, we need to take a look at the Union File System.
The Union File System
The Union File System (UFS) specialises in not storing duplicate data.
If two images have identical data, that data does not have to be recorded twice on disk. Instead, you can store the data once and then use it in many locations. This is possible with something called a layer.
Each layer is a file system, and as the name suggests, they can be layered on top of each other. Crucially, single layers containing shared files can be used in many images. This allows images to be constructed and deconstructed as needed, via the composition of different file system layers.
The layers that come with an image you pull from the Docker Hub are read-only. But when you run a container, you add a new layer on top of that. And the new layer is writable.
When you write to that layer, the entire stack is searched for the file you are writing to. And if a file is found, it is first copied to the writable layer. The write operation is then performed on that layer, not the underlying layer.
This works because when reading from a UFS volume, a search is done for the file that is being read. The first file that is found, reading from top to bottom, is used. So files on the writeable layer of your container are always used.
If we were to run thousands containers based on the same base layers we reap huge benefits in both startup time and disk space.
One example setup that would benefit is a web app that horizontally scales many identical web servers. Another would be a hosting company that provides the same basic image to all customers, and then only writes the data that customers add or change.
Storage Drivers
To see what storage driver your Docker engine is using, run:
$ sudo docker info
If you're using the Docker default storage driver, you should see something like this:
Containers: 0
Images: 622
Server Version: 1.9.1
Storage Driver: aufs
 Root Dir: /var/lib/docker/aufs
 Backing Filesystem: extfs
 Dirs: 624
 Dirperm1 Supported: true
Execution Driver: native-0.2
Logging Driver: json-file
Kernel Version: 3.19.0-56-generic
Operating System: Ubuntu 15.04
CPUs: 2
Total Memory: 3.593 GiB
Name: mavungu-Aspire-5250
ID: 6MUZ:QTM5:GEHK:KQF5:4GUD:BQVX:NKCM:XH4M:6ESI:BGB7:6PYS:AEJY
Username: mazembo
Registry: https://index.docker.io/v1/
WARNING: No swap limit support
Notice the Storage Driver: aufs line in this output. That means we're using the stock AUFS driver.
That's all we'll say about storage drivers for now, as there's way too much to cover in this post. If you want to know more, the official docs are a good place to start.
Let's look at the way Docker works with app generated data.
Volumes
A volume is a directory mounted inside a container that exists outside of the union file system. They are created via a Dockerfile, or the Docker CLI tool. The volume can map to an existing directory on the host machine, or remote NFS device.
The directory a volume maps to exists independently from any containers that mount it. This means you can create containers, write to volumes, and then destroy the containers again, without fear of losing any app data.
Volumes are great when you need to share data (or state) between containers, by mounting the same volume in multiple containers. Though take note: it's important to implement locks or some other concurrent write access protection.
They're also great when you want to share data between containers and the host machines, for example accessing source code.
Another common use is of volumes is when you're dealing with large files, such as logs or databases. That's because writing to a volume is faster than writing to the union file system, which uses the (IO expensive) copy-on-write mechanism.
To demonstrate the power of volumes and how to use them, let's look at two scenarios.
RUNNING A CONTAINER WITH A VOLUME FLAG
Launch a container with -v, the volume flag:
$ sudo docker run -d -v /code -p 8080:80 --name mynginx nginx
This creates a procedurally named directory (which we will look at shortly) on the host machine and then maps it to the /code directory in the container.
You can see the volume has been created and mounted with this command:
$ sudo docker inspect mynginx
You should see a long JSON-like output like this:
"Mounts": [
        {
            "Name": "12f6b6d488484c65bedcda8300166d76e6879a496ce2d0742ab23981621c8b1a",
            "Source": "/var/lib/docker/volumes/12f6b6d488484c65bedcda8300166d76e6879a496ce2d0742ab23981621c8b1a/_data",
            "Destination": "/code",
            "Driver": "local",
            "Mode": "",
            "RW": true
        },
    ],
"Image": "nginx",
        "Volumes": {
            "/code": {},
            "/var/cache/nginx": {}
        },
This output confirms the creation of the volume at the docker engine level as well as the mapping to the container’s /code directory. Also take note of /var/lib/docker/volumes/12f6[...]/_data, being the the volume path. We will use this path to access our data on the host machine.
Okay, next, grab a shell inside the container:
$ sudo docker exec -it mynginx /bin/bash
Check the /code directory exists:
$ ls
bin  boot  code  dev  etc  home  lib  lib64  media  mnt  opt  proc  root  run  sbin  srv  sys  tmp  usr  var
Change to the /code directory:
$ cd code
Write something to a test file:
$ echo Hello > myfile
And exit the container:
$ exit
Cool. So we just wrote some data to a file inside the volume mount inside our container. Let's look inside that directory on the host machine we saw in the docker inspect output above to see if we can find the data we wrote.
Login as the superuser, so you can access the Docker lib files:
$ sudo –i
Now, change to the directory listed in the previous docker inspect output:
$ cd /var/lib/docker/volumes/12f6b6d488484c65bedcda8300166d76e6879a496ce2d0742ab23981621c8b1a/_data
Check the contents of the directory:
$ ls
myfile
Bingo! That's the file we created inside the container.
You can even run cat myfile if you want to check the contents are the same. Or additionally, you could modify the contents here and then grab a shell inside the container and check that it has been updated there.
CREATE ENGINE LEVEL VOLUMES AND STORAGE FOR TRANSIENT CONTAINERS
Since Docker 1.9, it is possible to create volumes using the Docker API.
You can create a volume via the Docker API like this:
$ sudo docker volume create --name myvolume
We can check it worked like so:
$ sudo docker volume inspect myvolume
[
    {
        "Name": "myvolume",
        "Driver": "local",
        "Mountpoint": "/var/lib/docker/volumes/myvolume/_data"
    }
]
Now, let's run a little test:
$ sudo docker run -d -v myvolume:/data busybox sh -c "echo Hello > /data/myfile.txt"
What's happening here?
First, we launch a busybox container and mount the myvolume volume to the /data directory. Then we execute a command inside the container that writes "Hello" to the /data/myfile.txt file. After that command has run, the container is stopped.
You can modify the above command to run cat /data/myfile.txt if you want to read the data from inside the container at any point.
So, let's see if we can find that file on our host machine.
Log in as the superuser:
$ sudo –i
Then change directory to the path listed as the Mountpoint in the output from the docker volume inspect myvolume command above.
$ cd /var/lib/docker/volumes/myvolume/_data
And again, check the contents:
$ ls
myfile
You can then read this file, write to it, and so on. And everything you do will be reflected inside the container. And vice versa.
CREATE ENGINE LEVEL VOLUMES AND STORAGE FOR TRANSIENT CONTAINERS
Since Docker 1.9, it is possible to create volumes using the Docker API.
You can create a volume via the Docker API like this:
$ sudo docker volume create vol1$ $ sudo docker volume ls DRIVER VOLUME NAME local vol1
$ sudo docker volume inspect vol1
[
    {
        "CreatedAt": "2022-02-28T05:11:07Z",
        "Driver": "local",
        "Labels": {},
        "Mountpoint": "/var/lib/docker/volumes/vol1/_data",
        "Name": "vol1",
        "Options": {},
        "Scope": "local"
    }
]
Now, let's run a little test by cd into this location
root@dockerboss:/var/lib/docker/volumes/vol1/_data# docker run -itd vol1:/logs ubuntuWhat's happening here?
So, let's see if we can find that file on our host machine.
You can then read this file, write to it, and so on. And everything you do will be reflected inside the container. And vice versa.
Conclusion
In this post on Docker storage, we saw:
How docker images are stored locally by the Docker engine
How the copy-on-write mechanism and the union file system optimize storage and start up time for Docker containers
The variety of storage drivers compatible with Docker
How volumes provide shared persistent data for Docker containers
Install Docker
| Purpose | Command |
|---|---|
| Install Docker | yum install docker -y |
| Enable Docker Service | systemctl enable docker |
| Start Docker Service | systemctl start docker |
| Check Docker service | systemctl status docker |
| Add user to group | usermod -a -G docker ec2-user |
| Check Docker Version | docker version |
| Check Docker Info | docker info |
| Login to DockerHub | docker login |
| Logout of DockerHub | docker logout |
Docker Images
| Purpose | Command |
|---|---|
| List images | docker images |
| Pull image from DockerHub | docker pull <img> |
| Rename image | docker image tag <img> <new-name> |
| Push images to DockerHub | docker push <img name> |
| Remove image | docker rmi <img> |
| Remove unused images | docker image prune -a |
| Remove all images | docker rmi $(docker images -q) |
Docker Containers
Containers are isolated execution environments.
| Purpose | Command |
|---|---|
| List continers | docker ps -a |
| Create a container form an image | docker run -it -d -p 8080:80 --name service1 httpd |
| Rename container | docker rename <container> <new name> |
| Stop container | docker stop <container> |
| Start container | docker start <continer> |
| Restart container | docker restart <container> |
| Create a container with a link | docker run -it -d --name service2 --link service1 ubuntu |
| Execute container | docker exec -it <container> bash |
| Create an image from a container | docker commit <container> <new-img-name> |
| Remove container | docker rm <container> |
| Removes all stopped containers | docker container prune |
| kill all running containers | docker kill $(docker ps -q) |
Docker Storage
Docker has two options for containers to store files in the host machine, so that the files are persisted even after the container stops: volumes, and bind mounts.
| Purpose | Command |
|---|---|
| Create a volume | docker volume create <vol name> |
| List volumes | docker volume ls |
| Inspect a volume | docker volume inspect <vol name> |
| Remove a volume | docker volume rm <vol name> |
| Start a container with a new volume | docker run -d --name service1 --mount source=vol1,target=/app nginx |
| Start a container with an existing volume | docker run -it -d --name service2 -v /home/ec2-user/storage:/testfile ubuntu |
| Remove unused volumes | docker volume prune |
Docker File
Create a dockerfile vim dockerfile
FROM ubuntu
ARG DEBIAN_FRONTEND=noninteractive
RUN apt update -y
RUN apt install -y apache2
ADD . /var/www/html
ENTRYPOINT apachectl -D FOREGROUND
ENV name DevOps
FROM ubuntu
ARG DEBIAN_FRONTEND=noninteractive
RUN apt update -y
RUN apt install -y apache2
ADD . /var/www/html
ENTRYPOINT apachectl -D FOREGROUND
ENV name DevOps
Create an index.html file vim index.html
<html>
<title> Hello from CodingDojo </title>
<body> Hello world! </body>
</html>
<html>
<title> Hello from CodingDojo </title>
<body> Hello world! </body>
</html>
| Purpose | Command |
|---|---|
| Build an image from dockerfile | docker build -t dockerfile . |
| Create a container form the image | docker run -d -p 8080:80 dockerfile |
To access the container http://publicIP:8080
Docker Swarm
Docker swarm is a container orchestration tool, meaning that it allows the user to manage multiple containers deployed across multiple host machines. One of the key benefits associated with the operation of a docker swarm is the high level of availability offered for applications.
| Purpose | Command |
|---|---|
| Initialize a swarm | docker swarm init |
| Join a node to a swarm | docker swarm join --token <token> HOST:PORT |
| Leaves the swarm | docker swarm leave --force |
| List nodes in the swarm | dokcer node ls |
| Promote node to manager | docker node promote <node> |
| Demote node from manager | docker node demote <node> |
| Creates a service | docker service create alpine ping 8.8.8.8 |
| List services | docker service ls |
| Lists the tasks that are running | docker service ps <service name> |
| Updates a service | docker service update <service ID> --replicas 3 |


No comments:
Post a Comment