Networking overview
One of the reasons Docker containers and services are so powerful is that you can connect them together, or connect them to non-Docker workloads. Docker containers and services do not even need to be aware that they are deployed on Docker, or whether their peers are also Docker workloads or not. Whether your Docker hosts run Linux, Windows, or a mix of the two, you can use Docker to manage them in a platform-agnostic way.
This topic defines some basic Docker networking concepts and prepares you to design and deploy your applications to take full advantage of these capabilities.
Scope of this topic
This topic does not go into OS-specific details about how Docker networks work, so you will not find information about how Docker manipulates iptables rules on Linux or how it manipulates routing rules on Windows servers, and you will not find detailed information about how Docker forms and encapsulates packets or handles encryption. See Docker and iptables.
In addition, this topic does not provide any tutorials for how to create, manage, and use Docker networks. Each section includes links to relevant tutorials and command references.
Network drivers
Docker’s networking subsystem is pluggable, using drivers. Several drivers exist by default, and provide core networking functionality:
bridge: The default network driver. If you don’t specify a driver, this is the type of network you are creating. Bridge networks are usually used when your applications run in standalone containers that need to communicate. See bridge networks.host: For standalone containers, remove network isolation between the container and the Docker host, and use the host’s networking directly. See use the host network.overlay: Overlay networks connect multiple Docker daemons together and enable swarm services to communicate with each other. You can also use overlay networks to facilitate communication between a swarm service and a standalone container, or between two standalone containers on different Docker daemons. This strategy removes the need to do OS-level routing between these containers. See overlay networks.ipvlan: IPvlan networks give users total control over both IPv4 and IPv6 addressing. The VLAN driver builds on top of that in giving operators complete control of layer 2 VLAN tagging and even IPvlan L3 routing for users interested in underlay network integration. See IPvlan networks.macvlan: Macvlan networks allow you to assign a MAC address to a container, making it appear as a physical device on your network. The Docker daemon routes traffic to containers by their MAC addresses. Using themacvlandriver is sometimes the best choice when dealing with legacy applications that expect to be directly connected to the physical network, rather than routed through the Docker host’s network stack. See Macvlan networks.none: For this container, disable all networking. Usually used in conjunction with a custom network driver.noneis not available for swarm services. See disable container networking.Network plugins: You can install and use third-party network plugins with Docker. These plugins are available from Docker Hub or from third-party vendors. See the vendor’s documentation for installing and using a given network plugin.
Network driver summary
- User-defined bridge networks are best when you need multiple containers to communicate on the same Docker host.
- Host networks are best when the network stack should not be isolated from the Docker host, but you want other aspects of the container to be isolated.
- Overlay networks are best when you need containers running on different Docker hosts to communicate, or when multiple applications work together using swarm services.
- Macvlan networks are best when you are migrating from a VM setup or need your containers to look like physical hosts on your network, each with a unique MAC address.
- Third-party network plugins allow you to integrate Docker with specialized network stacks.

f you are working your way through the user guide, you just built and ran a simple application. You’ve also built in your own images. This section teaches you how to network your containers.
Launch a container on the default network
Docker includes support for networking containers through the use of network drivers. By default, Docker provides two network drivers for you, the bridge and the overlay drivers. You can also write a network driver plugin so that you can create your own drivers but that is an advanced task.
Every installation of the Docker Engine automatically includes three default networks. You can list them:
let pull ubuntu for demo
$ docker network ls
NETWORK ID     NAME      DRIVER    SCOPE
bb9dc0e96308   bridge    bridge    local
2435e354c788   host      host      local
987819fa19d0   none      null      local
The network named bridge is a special network. Unless you tell it otherwise, Docker always launches your containers in this network. Try this now:
$ docker run -itd --name=networkdockerboss ubuntu
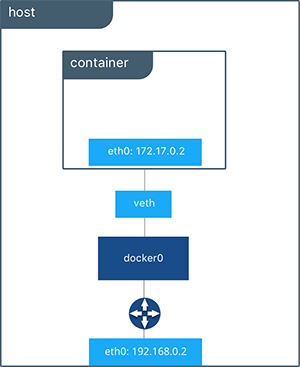
Inspecting the network is an easy way to find out the container’s IP address.
$ docker network inspect bridge

[
    {
        "Name": "bridge",
        "Id": "bb9dc0e963086321549b790c2e54952d7a8bd27f0369711c9fb2478de446e43a",
        "Created": "2022-02-26T17:25:30.08377109Z",
        "Scope": "local",
        "Driver": "bridge",
        "EnableIPv6": false,
        "IPAM": {
            "Driver": "default",
            "Options": null,
            "Config": [
                {
                    "Subnet": "172.17.0.0/16"
                }
            ]
        },
        "Internal": false,
        "Attachable": false,
        "Ingress": false,
        "ConfigFrom": {
            "Network": ""
        },
        "ConfigOnly": false,
        "Containers": {
            "7ed8f24cbb66f89e3c8b8899440223bffa14e3582dc8dc53c09198cd2eb7fd01": {
                "Name": "networkdockerboss",
                "EndpointID": "337e29487bbe4f1e0bc9b2ec687de782fc6c8ed8ee576e16d6a64828e106400d",
                "MacAddress": "02:42:ac:11:00:02",
                "IPv4Address": "172.17.0.2/16",
                "IPv6Address": ""
            }
        },
        "Options": {
            "com.docker.network.bridge.default_bridge": "true",
            "com.docker.network.bridge.enable_icc": "true",
            "com.docker.network.bridge.enable_ip_masquerade": "true",
            "com.docker.network.bridge.host_binding_ipv4": "0.0.0.0",
            "com.docker.network.bridge.name": "docker0",
            "com.docker.network.driver.mtu": "1500"
        },
        "Labels": {}
    }
]
You can remove a container from a network by disconnecting the container. To do this, you supply both the network name and the container name. You can also use the container ID. In this example, though, the name is faster.
$ docker network disconnect bridge networkdockerboss
While you can disconnect a container from a network, you cannot remove the builtin bridge network named bridge. Networks are natural ways to isolate containers from other containers or other networks. So, as you get more experienced with Docker, create your own networks.
Create your own bridge network
Docker Engine natively supports both bridge networks and overlay networks. A bridge network is limited to a single host running Docker Engine. An overlay network can include multiple hosts and is a more advanced topic. For this example, create a bridge network:
$ docker network create -d bridge my_bridge
The -d flag tells Docker to use the bridge driver for the new network. You could have left this flag off as bridge is the default value for this flag. Go ahead and list the networks on your machine:
$ docker network ls

NETWORK ID          NAME                DRIVER
bb9dc0e96308   bridge      bridge    local
2435e354c788   host        host      local
b451a848eecb   my_bridge   bridge    local
987819fa19d0   none        null      local
If you inspect the network, it has nothing in it.
$ docker network inspect my_bridge

[
    {
        "Name": "my_bridge",
        "Id": "b451a848eecb7b3ba123e0b8e876198757fbff14824aa6d0d2f64cdaf612ae3b",
        "Created": "2022-02-26T21:08:53.975696582Z",
        "Scope": "local",
        "Driver": "bridge",
        "EnableIPv6": false,
        "IPAM": {
            "Driver": "default",
            "Options": {},
            "Config": [
                {
                    "Subnet": "172.18.0.0/16",
                    "Gateway": "172.18.0.1"
                }
            ]
        },
        "Internal": false,
        "Attachable": false,
        "Ingress": false,
        "ConfigFrom": {
            "Network": ""
        },
        "ConfigOnly": false,
        "Containers": {},
        "Options": {},
        "Labels": {}
    }
]
Add containers to a network
To build web applications that act in concert but do so securely, create a network. Networks, by definition, provide complete isolation for containers. You can add containers to a network when you first run a container.
Launch a container running a PostgreSQL database and pass it the --network=my_bridge flag to connect it to your new network:
$ docker run -d --network=my_bridge --name db training/postgres
If you inspect your my_bridge you can see it has a container attached. You can also inspect your container to see where it is connected:
$ docker inspect --format='{{json .NetworkSettings.Networks}}' db
Now, go ahead and start a web application. This time don’t specify a network.
$ docker run -d --name web training/webapp python app.py
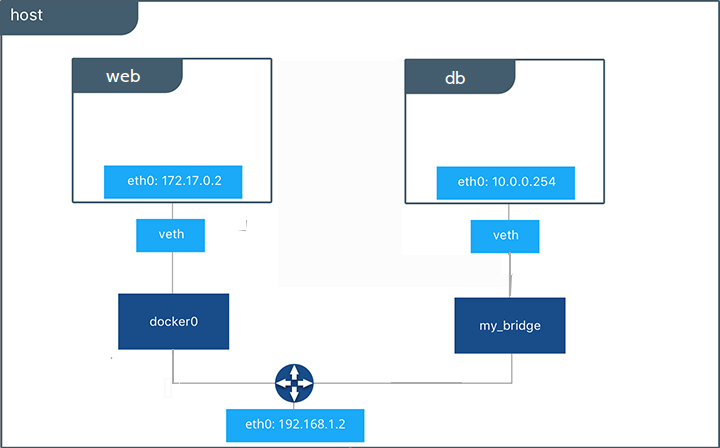
Which network is your web application running under? Inspect the application to verify that it is running in the default bridge network
$ docker inspect --format='{{json .NetworkSettings.Networks}}' web
Then, get the IP address of your web
$ docker inspect --format='{{range .NetworkSettings.Networks}}{{.IPAddress}}{{end}}' web


172.17.0.2
Now, open a shell to your running db container:
$ docker container exec -it db bash

root@a205f0dd33b2:/# ping 172.17.0.2
ping 172.17.0.2
PING 172.17.0.2 (172.17.0.2) 56(84) bytes of data.
^C
--- 172.17.0.2 ping statistics ---
44 packets transmitted, 0 received, 100% packet loss, time 43185ms
After a bit, use CTRL-C to end the ping and notice that the ping failed. That is because the two containers are running on different networks. You can fix that. Then, use the exit command to close the container.
Docker networking allows you to attach a container to as many networks as you like. You can also attach an already running container. Go ahead and attach your running web app to the my_bridge.
$ docker network connect my_bridge web
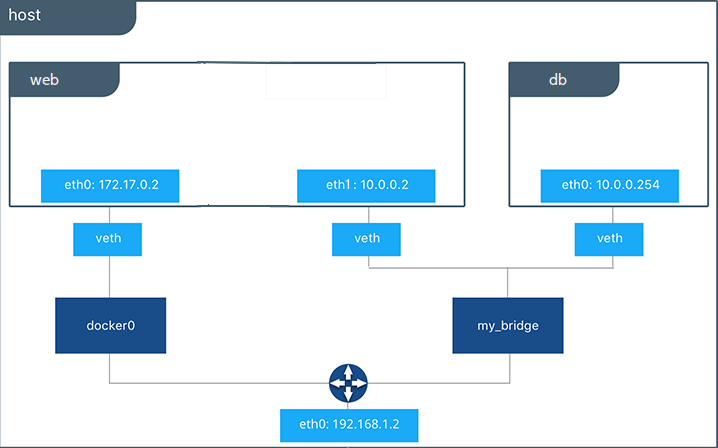
Open a shell into the db application again and try the ping command. This time just use the container name web rather than the IP address.
$ docker container exec -it db bash

root@a205f0dd33b2:/# ping web
PING web (10.0.0.2) 56(84) bytes of data.
64 bytes from web (10.0.0.2): icmp_seq=1 ttl=64 time=0.095 ms
64 bytes from web (10.0.0.2): icmp_seq=2 ttl=64 time=0.060 ms
64 bytes from web (10.0.0.2): icmp_seq=3 ttl=64 time=0.066 ms
^C
--- web ping statistics ---
3 packets transmitted, 3 received, 0% packet loss, time 2000ms
rtt min/avg/max/mdev = 0.060/0.073/0.095/0.018 ms
The ping shows it is contacting a different IP address, the address on the my_bridge which is different from its address on the bridge network.


No comments:
Post a Comment